
Lemon Meringue Pie
- icedcoffeand

- May 12, 2020
- 5 min read
Updated: May 13, 2020
This recipe isn't necessarily my own recipe but more of an amalgamation of three different recipes combined (I will reference where appropriate).
I enjoy making my own pastry but it does take up a portion of your day if you want to do it properly. If you are in a rush or lacking any energy I strongly suggest buying ready-made pastry! I, for example, will be doing this when I return to university and do not have the time to make good pastry. Also, another perk when buying readymade is that you are guaranteed to have a good pastry without any fuss!
I will be using pastry measurements for an 11inch pie but the filling and meringue for a 9inch pie and therefore the pie is 9inches. It is enough for six people! I use the different measurements because I like the pastry to be thin and comfortably stretch up the sides of the dish without cracking and breaking.
I hope you find this recipe super easy to use!
Major Equipment:
- 9inch loose-bottomed fluted flan tin
- Whisk
- Baine Maire (basically putting a glass bowl over a little bit simmering hot water to melt things such as butter. This is the best way to melt things as the substance doesn't stick to the heat at the bottom of the pan and melts more gently so doesn't burn!)
- A scale
- Large bowl
- Rolling pin
- Strainer
- Medium glass bowl
-Grater
- Manual Whisk
- Piping bag (optional)
PASTRYThis pastry is taken from 'The Aga Book' written by Mary Berry, it is my favourite recipe for the pastry and is super super easy to use!
Preheat the oven to 180 degrees C
Ingredients:
225g plain flour
25g icing sugar
100g soft butter cut into small pieces
1 egg yolk (save the white as you can use in the meringue)
Around 2 tablespoons of water
Directions:
1. Sieve the flour and sugar into a large bowl and mix the butter in until it resembles fine breadcrumbs.
2. Add the egg yolk and water and work the mixture.
To begin I use a wooden spoon until the dough begins to come together and then I use my hands to bring it firmly together. If the dough is crumbling and not coming together, add a little bit of water and work until it does come together. Be patient and don't add to much water or it will become too runny!
3. Dust a clean surface with flour and place your pastry on it and use a rolling pin to flatten your pastry.
It is important to roll your pastry out equally, I roll for two and then turn the pastry. To make sure it will fit the tin, just place the tin over the flat pastry. The pastry should be bigger than the tin. However, you should not have an excess of pastry. (See the gallery below.)
4. Dust the rolling pin with more flour and use it to gently lift up the pastry and place in the dish. Push the pastry very gently into the edges but not too hard that is breaks!
5. Prick the base with a fork and allow to freeze for a minimum for 30 minutes!
6. Once the pastry has frozen place into the oven at 180 degrees C and cook for about 7 minutes and then turn it and cook for 7 more
7. Once this is done, you can leave the pastry to cool and begin the filling!


THE FILLINGThis recipe is based on the recipe from 'Pretty. Simple. Sweet'. It's a very straight forward recipe but fast-paced so you need to watch that you do not overcook the mixture!
Ingredients:
3 large eggs
150g caster sugar
120ml freshly squeezed lemon juice
1 tablespoon of lemon zest
56g of melted butter
Tip: get your butter out early and allow it to soften as it will allow you to whisk easier making it smoother.
Tip: freeze your lemon skins after use they are easier to grate for the zest
Directions:
1. In a medium-sized bowl place eggs, sugar, lemon zest and juice and whisk to combine.
2. Place the bowl over a saucepan of simmering water. Here you must whisk constantly on a low heat until the mixture becomes thick. This takes about 10 minutes.
Do not allow the water in the pan to touch the bowl as then the water is cooking the mixture and not the steam.
Patience is again key here as for a while the mixture does not thicken but if you persist it does and you will get a lovely thick yellowly mixture!
To check if the mixture is done, run a wooden spoon through it and it should coat the back of it nicely
3. Remove from the heat and push through a strainer into a bigger bowl. This removes any lumps from the mixture
4. Now add your melted butter and whisk again until it is completely smooth.
5. Place to the side and cool.


THE MERINGUEThis is my own meringue recipe that I have developed. Again like many things in this recipe, patience is key - it may look like the meringue isn't developing peaks but keep going and it eventually will.
Ingredients
6 egg whites
around 120g caster sugar
Tip before you start: make sure your egg whites are completely clear of yolk or shell otherwise they will not combine properly. And make sure your large bowl is completely clean or dry as again it will not combine properly if there is anything else in there.
Directions
1. Place the egg whites in a large clean bowl and begin whisk electronically.
I like to whisk on a low speed throughout to maintain consistency
2. As you continue to whisk the whites should become foamy and bubbly and begin to form soft easily collapsable peaks when you lift the whisk up. Here you can begin to slowly add the sugar.
3. Add the sugar a bit at a time, continuing to whisk all the time. Once you have added all the sugar continue to whisk for around 5-10 minutes.
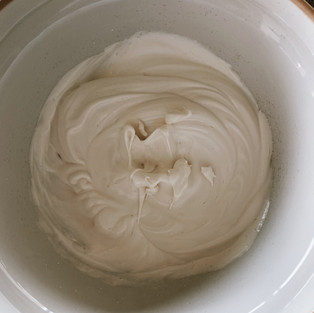
4. After this time, the mixture should be soft and glossy and forming stable peaks when you lift the whisk up.
To make sure the mixture is 100% ready, tip the bowl upside and the mixture should not move from the bowl.


ASEMBLING THE PIE Once you have made all three elements of the pie it is time to assemble and make cook it!
1. Preheat your oven to the highest temperature
2. Give the filling a final stir and then spread it evenly over the pastry
3. Now either pipe the meringue on to the filling or spoon evenly using a fork to lift it up to peak it.
4. Place the pie into the oven for 5 minutes to allow the tips of the meringue to burn
5. Remove and set your oven to 100 degrees C
6. Once ready, place the pie into the oven and cook for a further 15 minutes
7. Once done, place the pie onto a cooling rack and once cooled place in the fridge to set!


J xo

Comments